
Patrick Gilbert PT, DPT, ATC, CSCS
Pull-ups are a staple movement pattern in most, if not all training programs. They are one of the purest ways to judge upper body pulling strength. The upper body pull is just one of the six fundamental movement patterns highlighted in my 12-week training program, Fundamentals of Training. However, many people struggle with performing pull-ups. They require quite a bit of grip strength, upper body strength and postural endurance. When all else fails and you get to the sticking point of your last ugly rep of a set, compensations are bound to occur. Luckily, there are many ways to regress the pull-up pattern in order to nail down the basics and improve your form without having to struggle to complete a few or even a single true pull-up. For the purposes of this article I will only be discussing the traditional, pronated grip pull-up. Other versions of bodyweight vertical pulls include chin-ups, which typically feature a supinated grip, as well as a neutral grip pull-up, where your palms face each other. Each has its own benefits and unique characteristics, but we will stick with pull-ups today. We will go through six different regressions, from easiest to hardest based on bodyweight and positioning. Easing up on the load being pulled allows us to focus on proper form and utilizing the right muscles. Before getting into each regression, I’d like to first go over what I consider “proper” pull-up form. Here we go!
Executing a Strict Pull-Up
There are many factors that go into performing a high-quality pull-up. But first, let me explain the main difference between a strict pull-up versus what is known as a kipping pull-up. At its very core, the main difference is that you cannot use momentum to assist you in performing a strict pull-up. On the other hand, with kipping pull-ups, which have been popularized in the last decade-plus by Crossfit, you are allowed and encouraged to utilize momentum from your lower body and hips specifically in order to get your chest up to the bar. I am not saying kipping pull-ups are inherently bad, but if your goal is true back strength you are much better off working on strict pull-ups.
Now that I’ve climbed down from my soap box, let’s get into exactly what goes into a strict pull-up. Let’s begin with the starting position. Yes, where you start from matters. Immensely. Without a stable base, you only make it more difficult on yourself to perform a pull-up. It goes back to that saying, “you can’t fire a cannon out of a canoe”. So how do you create a stable base when your feet aren’t touching the floor? Most of it has to do with core activation, but the glutes and legs are also involved. Start by hanging from the bar. The width of the grip can vary based on where you are comfortable with. In general, a narrower grip will be slightly easier, as you can recruit other muscles to assist the lats, while a wider grip will truly test the lats in relative isolation. I like to start with a grip that is just outside shoulder width. From here, contract your core so that your ribcage gets pulled down towards your hips and your abdomen is braced. This should cause your hips to flex slightly. This is known as a “hollow hold” position. Once in this hollow hold, squeeze your glutes, which should create some slight external rotation of your hips. Firing your glutes allows for a bit of tension to develop in your thoracolumbar fascia, the tissue connection between your lats and glutes. This thoracolumbar fascia also has attachments to the obliques and deeper transverse abdominis1, which should already be activated via core stabilization. Focus on keeping your legs straight and core tight, so your legs do not swing as you perform the pull-up.
The main difference between strict and kipping pull-ups is that you cannot use momentum to assist you in performing a strict pull-up
Tweet
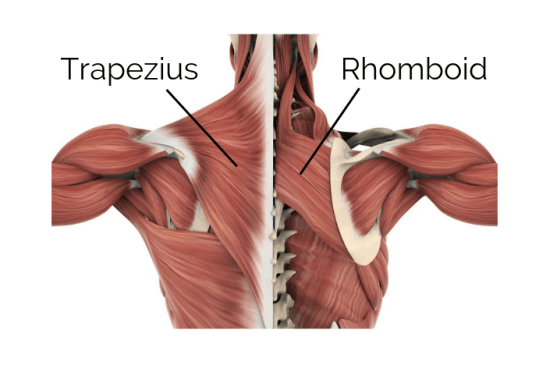
Once you have a stable base set by your core, glutes and legs, it is time for the upper body to shine. As you hold the bar and hang below it, your upper arms will obviously be in a position of nearly full abduction. This brings your shoulder blades into elevation and upward rotation. From this hanging position, bring your shoulder blades down and toward each other (more on this later) using your lats and scapular retractors, which are primarily comprised of the rhomboids and middle trapezius. This ensures a stable scapular position on your ribcage prior to initiating movement. Though this position is important to begin a pull-up, the goal is not for your shoulder blades to remain fixed in this position; they should go through downward rotation as your upper arms adduct closer to your sides throughout the concentric portion of the movement. In retracting your shoulder blades, you will also inherently recruit the muscles of the rotator cuff (supraspinatus, infraspinatus, teres minor and subscapularis) in order to stabilize your shoulder joint. While they do not directly contribute to the pull-up, it is extremely important for your shoulders to be stable prior to initiating the pull motion of this compound movement.
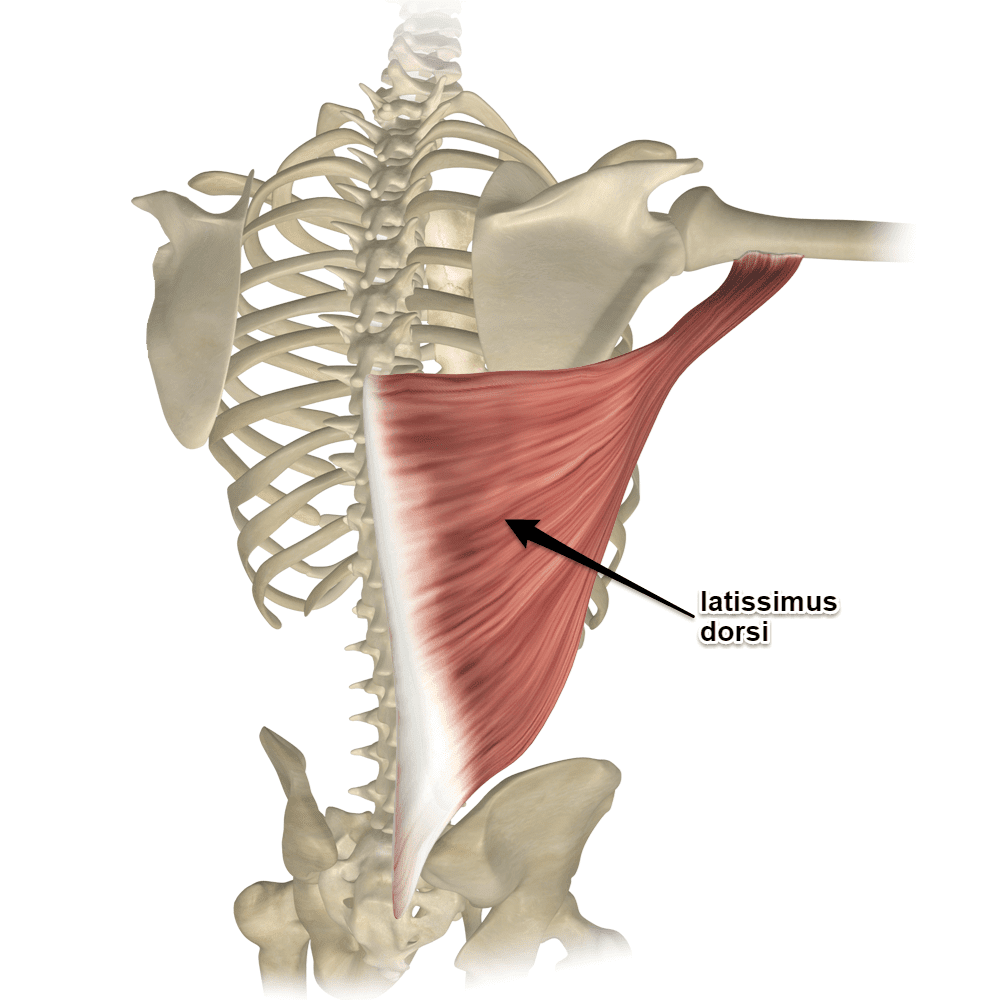
After setting your shoulder blades, your lats are called into duty once again. The lats are very broad, powerful muscles that originate from the thoracic and lumbar spine via the thoracolumbar fascia and attach to the upper arm at the proximal humerus. They are primarily responsible for extension, adduction and internal rotation of the shoulder. They are easily the most important muscle used while performing a pull-up.
As you pull yourself up to the bar, envision your chest leading the movement with your elbows at or behind midline. Make sure to maintain an upright and open chest, rather than rounding your upper back. This will ensure that you maintain good positioning with your shoulder blades on your ribcage and are truly utilizing your posterior back musculature instead of your accessory muscles like the upper trapezius and biceps to accomplish the movement. As you bring yourself near the bar, suppress the urge to stick your chin up and over the bar. You’ve undoubtedly seen this in gyms and online, but this goes against every principle we have talked about in terms of keeping proper posture throughout this exercise. Instead, keep your head and neck in a neutral position and let your back do the work. Pause for a brief moment at the top of this movement before slowly controlling your descent.
Once you reach the bottom position again, do not release your scapular position or the hollow hold you have held throughout. The goal is to maintain tension during the entire set of this exercise. With this in mind, there is something to be said for working on that initial stabilizing position on its own. I address this point at the end of the article but will say that these are typically two, separate things and should be trained independently, unless you have a good reason to release tension between reps.
So there you have it – how to execute a proper pull-up. Now let’s get into what you can do if that strict pull-up is a challenge to perform. Here are six regressions of the pull-up that you can utilize to improve and perfect your pull-up form.
1. Half-Kneeling Band Pulldown
To kick this thing off, we will start with the most basic form of a pull-up. Instead of actually pulling your body up, you will pull a superband down toward you. Begin in a half-kneeling position; with one knee down and the other foot on the floor with your hip and knee in a 90-90 position. Once in this position, engage your core and glutes so you have a stable base to pull from. From here, take hold of each end of the band in your hands. The goal of this position is to isolate the upper body during this pulling movement. By taking your lower body out of it, you will focus on your lats and scapular retractors, which are primarily responsible for this movement.
After you have taken these initial steps, let’s tackle the actual pulling movement. The movement of the arms should mimic the movement they undergo during a pull-up, starting outstretched above your head, then pulling down until your elbows are next to your sides and your shoulder blades are retracted. Pause for a moment at the bottom of this movement, squeezing your lats and shoulder blades, before slowly returning the band to the starting position. Ensure that you keep tension in your muscles and in the band throughout. We want to move with intensity while staying under control and ensuring that your upper body moves through the proper path.
2. Tall-Kneeling Band Pulldown
This tall-kneeling variation is the same exercise as outlined above but with one key difference. By performing this band pulldown while kneeling on both knees instead of one, you force your glutes and core to be much more active throughout the movement. The glutes must stay engaged in order to remain upright. Otherwise, the hips will sink backward, creating a poor base to pull from. However, by activating the glutes, more demand is placed on the anterior core. This is by no means a bad thing, as proper core stabilization and control is imperative for proper pull-up form. Without a balanced core and lower body, you are forcing your upper body to work extra hard to perform a pull-up. By utilizing your core to stabilize the connection from upper body to lower, as well as turning on the glutes to maintain a relatively rigid leg position, you make it much easier for your lats and scapular retractors to do their job in pulling the rest of your body up to the bar. Same principles apply here as above; pull with intent and proper form while pausing for a brief moment at the bottom of this movement to squeeze those retractors.
Proper core stabilization and control is imperative for proper pull-up form
Tweet
3. Modified Pull-Up from Deep Squat
For this pull-up modification we will actually start pulling your body up towards your hands, instead of pulling down like in the first two examples. This variation takes the weight of the lower body away by starting in a deep squat while your hands are grasping the bar. You want your rear end to be clear of the floor by at least a few inches. The idea is not to push with your legs, but rather to have your feet planted on the floor to make your lower body “dead weight”, so you aren’t necessarily pulling your whole body up. However, if this variation proves too difficult to maintain proper form, you are certainly allowed to use your legs to assist your upper body by pushing slightly into the floor in order to perform a quality pull-up.
The nice thing about this variation is that it can be performed using multiple forms of equipment. First, you can utilize a barbell inside a squat rack (shown in the video above). For this setup, you want the bar just out of your reach as you sit on the floor. You may also use a suspension trainer such as a TRX or rings. In this case, you should utilize the same height as you would for the barbell. If you have a tall box that can stand on so that your chest is at the height of the pull-up bar, that will also work.
4. Toe-Assisted Pull-Up
Next we move into a variation that comes very close to a strict pull-up, but again gives us the ability to take some bodyweight off using the lower body. Like the last regression, there are a couple ways to set this one up. You can either utilize a barbell in a squat rack set up at about chin height, or set up a box or bench under a pull-up bar, again so the bar is at about chin height. From here, grasp the bar while your toes are on the floor or box. Everything from the waist up will look exactly like a strict pull-up. The only change is that your toes will remain in contact with the floor or box throughout. This gives you the option to utilize the lower body as much or as little as you need in order to perform perfect pull-ups. Ensure that you activate your core and engage your scapular retractors in order to create a stable base, as described previously. Focus on pulling your elbows back and down towards your sides, just like in a strict pull-up. Your upper body should move as a unit, without any sway or wasted movement. Make sure that you maintain a vertical path from the bottom to the top of this movement, no matter how much assistance you are getting from the legs.
Your upper body should move as a unit during a pull-up, without any sway or wasted movement
Tweet
5. Eccentric-Only Pull-Up
This pull-up variation uses only the eccentric (lowering) portion of the movement to place overload onto the muscles in order to build strength in this movement pattern. To begin, place a box or bench under a pull-up bar and grab the bar. From here, jump up off the box so you are at the top of a pull-up position. Once here, make sure to engage your lats, stabilize your shoulder blades and contract your core immediately in order to get into a stable position. The biggest trick with this modification is creating a stable core and shoulder posture as soon as you get set at the top of the movement, so you are not swinging back and forth during the eccentric portion of this movement. This is harder than it sounds, so make sure you are comfortable and efficient at getting your core and shoulders set before trying this one.
After you get set at the top, slowly control your descent, maintaining lat engagement throughout and not relying on your biceps or other upper body accessory muscles to assist you. This regression is really nice because of the slow nature of the movement. It allows you to really focus your attention on the muscles at play. Use this slow tempo to hone in on your perfect form while lowering yourself from the bar. The slower you go, the more difficult this will be.
6. Band-Assisted Pull-Up
This is the final regression before performing strict, unassisted pull-ups. These can be tricky, as the band tension will change your center of gravity as you pull yourself up. All that means is that you need to be extra diligent when stabilizing your core and maintaining a solid posture throughout.
Begin by tying a superband around the center of the pull-up bar and letting one end hang down. From there, step up onto a box or bench beneath the bar and place either one foot or one knee inside that end of the band. Placing the band around your foot will make this regression easier than if the band is around your knee, just based on tension placed on the band. Starting with the band around your foot, step off the box and cross your other foot over the one inside the band, to ensure that the band will not slip off your foot. If performing this with the band around your knee, place the band somewhere between your kneecap and halfway down your shin. Too close to your knee and you risk the band slipping and possibly hitting you; too far down and you may find the band sliding down to your ankle. Once the band is secure on your upper shin, allow your other leg to extend out straight, as you did during the eccentric-only pull-ups.
Once hanging there, engage your core and retract your shoulder blades to get into the initial position for the pull-up. This will look like a modified hollow hold, since one knee is bent, but everything else will look the same. From here, contract your lats and pull yourself up to the bar. All the same rules I laid out in the initial section about performing a strict pull-up apply here. Maintain a controlled posture and tempo as you pull and lower yourself during this movement.
In addition to band placement around your foot or knee making a difference in terms of difficulty, the band thickness you choose will also offer a different amount of tension. Thicker bands will offer more assistance and make this exercise easier, while thinner bands will offer less support, making the movement more difficult to perform. You might start by performing this regression with a thicker band around your feet, then eventually transitioning to using a thinner band around your knee before finally ditching the band altogether!
Bonus – Hanging Scap Retraction
Yes, I know I said I had six regressions for you. But I couldn’t resist sharing this bonus “pull-up regression”. It is not a true pull-up, in that this exercise only works on the initial position of the pull-up, so I’m considering this a bonus. Anyway, let’s get to it.
Start this movement by hanging from the bar. Really let your body dangle under your grasp on the bar. From here, activate your core so your body assumes that hollow hold position I spoke about earlier. While your core is firing on all cylinders and your body position is stable, engage your lats and pull your shoulder blades down and back together. You can almost think of this as a reverse shrug. But instead of bringing your shoulders up towards your ears using your upper traps like in a normal shrug, here you will be bringing your shoulder blades down and away from your head. Squeeze and fight to hold this position for at least a second before slowly controlling the release of your scapular retractors and lats to return to that hanging position. Make sure to maintain the hollow hold using your core no matter what the rest of your upper body is doing. Work your way up to holding this scapular retraction for more time and controlling the lowering of your body as slowly as you can.
The other nice thing about this exercise is that you can perform it from multiple starting positions, which will offer different levels of difficulty. You can start by doing it from the deep squat position in regression #3, then work toward performing it with toe-assistance in regression #4, and finally during a full hang from the bar without any lower body assistance. Of course, you really only get the full core involvement and hollow hold when performing this from a free hang without feet assistance.
…
So there you have it. Six pull-up regressions (plus a bonus exercise) to put you on the fast track to improving your pull-up form and getting much more comfortable with the vertical pull. The two best pieces of advice I can offer when performing all of these regressions as well as strict pull-ups is to focus on form and make sure you are using the muscles you are intending to. It becomes easy to cheat and use other accessory muscles. While that may allow you to crank out more reps, we are looking for quality over quantity when it comes to pull-ups. Happy pulling!
References:
- Willard FH, Vleeming A, Schuenke MD, Danneels L, Schleip R. The thoracolumbar fascia: anatomy, function and clinical considerations. J Anat. 2012;221(6):507-536.
About the Author – Patrick Gilbert PT, DPT, ATC, CSCS
Patrick is a physical therapist, athletic trainer and personal trainer. He runs Summit Performance and Therapy in Indianapolis, Indiana. He has been training clients of all backgrounds for years and has been a practicing physical therapist since 2016. His training philosophy combines his knowledge of rehabilitation as well as strength and conditioning in order to train clients to achieve great results and avoid injuries in the process. His physical therapy practice focuses on a three-dimensional view and treatment of the body and its many parts. Treatment emphasizes manual techniques and rehabilitative exercises to get patients back to previous activity levels without pain or dysfunction.
For more information about training or rehabilitating with Patrick, contact him at SummitPerformancePT@gmail.com or visit SummitPerformancePT.com
